Integrate Gulp on a Maven managed project

Using front-end frameworks for a java web application like AngularJs and Bootstrap needs some caution to manage JavaScript and Css dependencies.

There are two tools family for front-end libraries management. The Java ones like Wro4j and Jawr witch have the advantage to integrate easily to Java project management softs like maven and grails and don’t need any extra knowledge.

The second ones are JavaScript tools like Grunt, Bower and Gulp. Those tools have a great success and have the advantage to be used for front-end frameworks development.

Photo credit: Tony lea

As a result, you will face less problems where managing front-end dependencies and optimizing web resources.

This this post presents a solution to use Maven, Bower and Gulp to manage front-end libraries for a java web project.

The source code of this post is available in this link and you can test it here.

Add frontend maven Plugin

Frontend plugin install node and npm and It lets you run Bower and Gulp.

Add the xml bellow to your project pom.xml file to configure “frontend-maven-plugin”.

<build>
    <plugins>    
         <plugin>
             <groupId>com.github.eirslett</groupId>
             <artifactId>frontend-maven-plugin</artifactId>
             <version>0.0.20</version>
             <executions>
                 <execution>
                     <id>install node and npm</id>
                     <goals>
                         <goal>install-node-and-npm</goal>
                     </goals>
                     <phase>generate-resources</phase>
                     <configuration>
                         <nodeVersion>v0.10.26</nodeVersion>
                         <npmVersion>1.4.3</npmVersion>
                     </configuration>
                </execution>
                <execution>
                     <id>npm install</id>
                     <goals>
                        <goal>npm</goal>
                     </goals>
                     <phase>generate-resources</phase>
                </execution>
                <execution>
                     <id>bower install</id>
                     <goals>
                        <goal>bower</goal>
                     </goals>
                     <configuration>
                        <arguments>install</arguments>
                     </configuration>
                </execution>
                <execution>
                     <id>gulp build</id>
                     <goals>
                         <goal>gulp</goal>
                     </goals>
                     <phase>generate-resources</phase>
                </execution>
            </executions>
         </plugin>
     </plugins>
</build>

Add front-end dependencies

Bower works by fetching and installing front-end packages. For more information about bower visit the website bower.io.

Add a bower.json file with front-end dependencies in the root directory of your maven project (next to the pom.xml file).

{
  "name": "example",
  "version": "0.0.1",
  "dependencies": {
    "jquery": "~2.1.3",
    "angular": "1.4.5",
    "angular-route": "1.4.5",
    "angular-resource": "1.4.5",
    "angular-sanitize": "1.4.5",
    "bootstrap": "3.3.4",
    "bootstrap-material-design": "0.3.0",
    "angular-swagger-ui": "~0.2.3"
  },
  "private": true
}

Add Glup module dependencies

Add package.json file with the content bellow.

{
  "name": "example",
  "version": "0.0.1",
  "dependencies": {
    "bower": "~1.3.12",
    "gulp": "^3.9.0",
    "gulp-concat": "^2.6.0",
    "gulp-concat-vendor": "0.0.4",
    "gulp-uglify": "^1.3.0",
    "main-bower-files": "^2.9.0",
    "gulp-minify-css" : "^1.2.1",
    "gulp-notify":"2.2.0",
    "gulp-inject": "1.5.0",
    "gulp-run-sequence": "0.3.2",
    "stream-series": "0.1.1",
    "gulp-gzip": "1.2.0",
    "gulp-clone": "1.0.0"
  },
  "jspm": {
    "dependencies": {
      "jquery": "github:jquery/jquery@^2.1.3"
    },
    "devDependencies": {
      "traceur": "github:jmcriffey/bower-traceur@0.0.88",
      "traceur-runtime": "github:jmcriffey/bower-traceur-runtime@0.0.88"
    }
  },
  "scripts": {
    "prebuild": "npm install",
    "build": "gulp"
  }
}

Add a Gulp execution file

Create the Gulp execution file gulpfile.js with the content bellow.

var gulp           = require('gulp');
var concat         = require('gulp-concat');
var concatVendor   = require('gulp-concat-vendor');
var uglify         = require('gulp-uglify');
var minify         = require('gulp-minify-css')
var mainBowerFiles = require('main-bower-files');
var inject         = require('gulp-inject');
var runSequence    = require('gulp-run-sequence');
var gzip           = require('gulp-gzip');
var clone          = require('gulp-clone');
var series         = require('stream-series');

var vendorJs;
var vendorCss;

gulp.task('lib-js-files', function () {
    vendorJs = gulp.src(mainBowerFiles('**/*.js'),{ base: 'bower_components' })
        .pipe(concatVendor('lib.min.js'))
        .pipe(uglify())
        .pipe(gulp.dest('src/main/webapp/resources/vendor/js'));

    vendorJs.pipe(clone())
        .pipe(gzip())
        .pipe(gulp.dest('src/main/webapp/resources/vendor/js'));
});

gulp.task('lib-css-files', function () {
    vendorCss = gulp.src(mainBowerFiles('**/*.css'), {base: 'bower_components'})
        .pipe(concat('lib.min.css'))
        .pipe(minify())
        .pipe(gulp.dest('src/main/webapp/resources/vendor/css'));

    vendorCss.pipe(clone())
        .pipe(clone())
        .pipe(gzip())
        .pipe(gulp.dest('src/main/webapp/resources/vendor/css'));
});

gulp.task('index', function () {
    var target = gulp.src("src/main/webapp/index.html");
    var sources = gulp.src(['src/main/webapp/resources/js/*.js', 'src/main/webapp/resources/css/*.css'], {read: false});
    return target.pipe(inject(series(vendorJs, vendorCss, sources), {relative: true}))
        .pipe(gulp.dest('src/main/webapp'));
});

gulp.task('copyFonts', function() {
    gulp.src(mainBowerFiles('**/dist/fonts/*.{ttf,woff,woff2,eof,svg}'))
        .pipe(gulp.dest('src/main/webapp/resources/vendor/fonts'));
});

// Default Task
gulp.task('default', function () {
    runSequence('lib-js-files', 'lib-css-files', 'index', 'copyFonts');
});

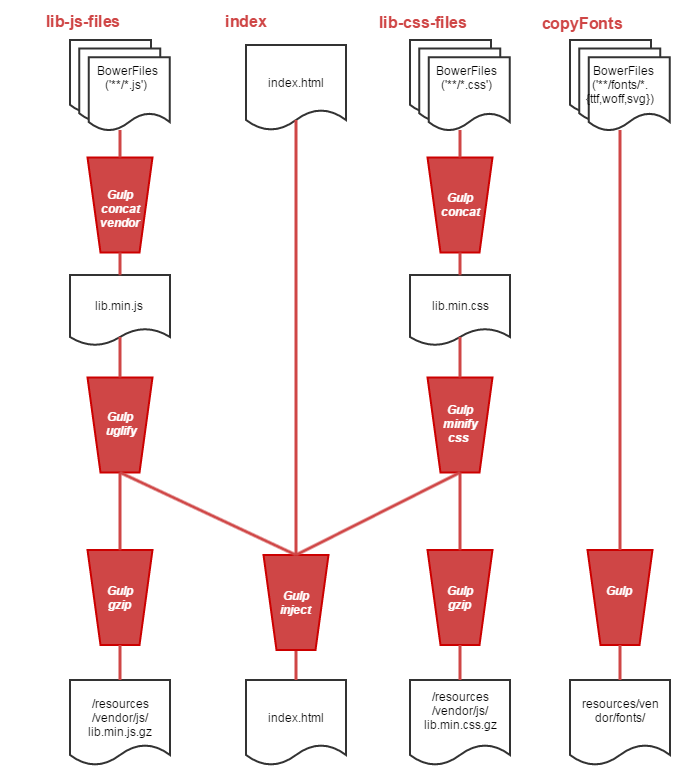
The gulp script has 4 tasks:

  • lib-js-files : concat, uglify and compress all vendor javascript dependencies
  • lib-css-files : concat, minify and compress all vendor css dependencies
  • index : inject the dependencies to file
  • copyFonts : copy fonts to vendor/font directory to keep css references

The graph bellow presents gulp tasks flows.

gulpgliffy

Configure Spring to resolve Gzip files

In this step, we configure Spring MVC framework to look for Gzip files for the application web resources.

@Configuration
@EnableWebMvc
// Extra config annotations 
public class MvcConfig extends WebMvcConfigurerAdapter {

    @Override
    public void addResourceHandlers(ResourceHandlerRegistry registry) {
        registry.addResourceHandler("/resources/vendor/**")
                .addResourceLocations("/resources/vendor/")
                .setCachePeriod(0)
                .resourceChain(true)
                .addResolver(new GzipResourceResolver())
                .addResolver(new PathResourceResolver());
    }

    // Extra config here

}

Build and deploy your application

Build your application by running :

mvn clean install

Under OpenShift, you may need to change home directory (npm needs to create files under HOME directory):
>HOME=$OPENSHIFT_DATA_DIR

If everything is well done, your project directory will have the structure described below.

project
   +-- bower_components **
   +-- node **
   +-- node_module **
   +-- src
   |    +-- main
   |    |     +-- java
   |    |     +-- resources
   |    |     \-- webapp
   |    |           +-- resources
   |    |           |      +-- css
   |    |           |      +-- js
   |    |           |      \-- vendor **
   |    |           |            +-- css
   |    |           |            |    +-- lib.min.css
   |    |           |            |    \-- lib.min.css.gz
   |    |           |            +-- fonts 
   |    |           |            |    +-- glyphicons-halflings-regular.svg
   |    |           |            |    +-- ....
   |    |           |            \-- js
   |    |           |                 +-- lib.min.js
   |    |           |                 \-- lib.min.js.gz
   |    |           +-- WEB-INF
   |    |           \-- index.html 
   |    +-- test
   +-- target
   +-- bower.json
   +-- gulpfile.js
   +-- package.json
   \-- pom.xml

Finally, deploy and run the application. The sample application of this post is deployed on this link.

The two pictures bellow present Chrome DevTools to compare network performance of the optimized web application which has a load time of 2.74s and the same application without resource optimization which has a load time of 3.37s.

2015_09_23_16_02_46_tomcat7_samerabdelkafi.rhcloud.com_fng_project_apiDoc 2015_09_23_16_03_24_tomcat7_samerabdelkafi.rhcloud.com_ng_swagger_apiDoc

Develop a web application with AngularJS and Spring MVC

Nowadays customers have a rich web experience with Gmail, Google Apps, Facebook and Twitter. A basic server side rendered web pages doesn’t fit anymore to the new HMI (human-machine interface) needs.

AngularJs is one of the most successful front-end frameworks for RIA (Rich Internet Application Development) development.

AngularJs encourages the use of the Model-View-Controller (MVC) design pattern to decouple the code and to separate concerns.


Denver Art Museum / Daniel Libeskind

Despite the Javascript language specificities, a JEE developer will appreciate having some best practice and design patterns that he’s familiar with.

This article illustrate how to integrate AngularJs to a Spring MVC project. I hope this article will help developers to take the plunge and start using AngularJs.

The sample project source code is available on this link github.com/samer-abdelkafi/ng-project.
The sample IHM Demo is available here.

1. Add AngularJs librery

I adopted Webjars as a way to manage static web resources via the Maven dependency management mechanism. This could be done by front package manager like Bower.

<dependency>
    <groupId>org.webjars</groupId>
    <artifactId>angularjs</artifactId>
    <version>1.3.8</version>
</dependency>


Add ResourceHandler for webjars to your Spring configuration file if it isn’t already done.

@EnableWebMvc
@Configuration
@ComponentScan(basePackages = { "com.mycompany.myproject.web.controller" })
public class MvcConfig extends WebMvcConfigurerAdapter {

    @Override
    public void addResourceHandlers(ResourceHandlerRegistry registry) {
        registry.addResourceHandler("/resources/**").addResourceLocations("/resources/");
        registry.addResourceHandler("/webjars/**").addResourceLocations("classpath:/META-INF/resources/webjars/");
    }
    // Non shown code
}

2. Develop the business logic

In this sample project, we have a simple business logic. The front-end get a list from a rest web service and display it.
The code bellow presents our business logic implementation.

Add a new javasvript file app.js.

angular
    .module('myApp', ['ngResource'])
    .service('UsersService', function ($log, $resource) {
        return {
            getAll: function () {
                var userResource = $resource('users', {}, {
                    query: {method: 'GET', params: {}, isArray: true}
                });
                return userResource.query();
            }
        }
    })
    .controller('UsersController', function ($scope, $log, UsersService) {
        $scope.users = UsersService.getAll();
    });

myApp : root module for the project.
UsersService : service for executing the http request
UsersController : controller executed when the page is loaded.

3. Develop the view part

AngularJs implements MVC pattern. The html page is the view part, the controller is developed client side by java script and the model is Json object to get from the server side.

Import AngularJs library to your Html code.

<!DOCTYPE html ng-app="myApp">
<html ng-controller="UsersController">
<!-- header code -->
<body>

<div ng-repeat="user in users">{{user.firstName}} {{user.familyName}}</div>

<script type="text/javascript" src="webjars/jquery/2.1.1/jquery.js"></script>
<script type="text/javascript" src="webjars/angularjs/1.3.8/angular.min.js"></script>
<script type="text/javascript" src="webjars/angularjs/1.3.8/angular-resource.min.js"></script>
</body>
</html>

4. Deploy and run the application

Now we will deploy and run the application to verify the configuration.

5. Application enhancement

5.1 Design enhancement

To enhance the application design, we use twitter bootstrap librery with a material design theme.

  • first step, add dependency for jquery, bootstrap and bootstrap-material-design using webjars.
  • Next, import css and js files to the html page.
  • finally, modify html code for displaying the list.

5.2 Functional enhancement

AngularJS comes with many handy filters built-in. We use “filter:string” to add search function. All strings or objects with string properties in array that match this string will be returned.

<!DOCTYPE html>
<html ng-app="myApp">
<head lang="en">
    <meta charset="UTF-8">
    <link rel="stylesheet" href="webjars/bootstrap/3.2.0/css/bootstrap.css">
    <link rel="stylesheet" href="webjars/bootstrap-material-design/0.2.1/css/material.css">
    <title></title>
</head>
<body ng-controller="UsersController">

<div class="row">
    <br>
    <div class="container">
        <div id="userList" class="col-sm-offset-1 col-sm-10">
            <div class="input-group">
                <input class="form-control" id="search" name="search" placeholder="Search for" ng-model="query"
                       required="required"/>
              <span class="input-group-btn">
                  <button type="submit" class="btn btn-default">
                      <i class="glyphicon glyphicon-search"></i>
                  </button>
              </span>
            </div>
            <div class="list-group">
                <div class="list-group-item">
                    <div ng-repeat="user in users | filter:query" class="list-group-item" style="margin-top:16px">
                        <div class="row-picture">
                            <img class="circle"
                                 src="http://i.forbesimg.com/media/lists/people/{{user.firstName | lowercase}}-{{user.familyName | lowercase}}_50x50.jpg"
                                 alt="icon">
                        </div>
                        <div class="row-content">
                            <h4 class="list-group-item-heading">{{user.firstName}} {{user.familyName}}</h4>

                            <p class="list-group-item-text"><i class="glyphicon glyphicon-envelope"></i> {{user.email}}
                            </p>
                        </div>
                    </div>
                </div>
            </div>
        </div>
    </div>
</div>
<script type="text/javascript" src="webjars/jquery/2.1.1/jquery.js"></script>
<script type="text/javascript" src="webjars/angularjs/1.3.8/angular.min.js"></script>
<script type="text/javascript" src="webjars/angularjs/1.3.8/angular-resource.min.js"></script>
<script type="text/javascript" src="webjars/bootstrap-material-design/0.2.1/js/material.js"></script>
<script type="text/javascript" src="resources/js/app.js"></script>
</body>
</html>

The picture bellow presents a print screen for the application.

I think AngularJs, is one of the best front-end framework. It has many great features like data binding, dependency injection, MVC pattern implementation and page templates.

The major new version 2.0 of AngularJS has a significant deference from version 1.X, but it doesn’t seem to have migration path. AngularJs developers will encounter a drastically different looking framework and will need to learn a new architecture.

Even though there is no compatibility with the version 2.0, actual version has many good features and it’s still a good choice as a front-end framework.

Beautify your Java web application with Bootstrap

Bootstrap is one of the most popular front-end framework for developing responsive web design. It includes buttons, form inputs, links, columns, and tons of other pre-formatted page objects.

The mixt of Bootstrap and Spring MVC gives a powerfull toolbox to develop a web application running in both desktop and mobile devices.


This post presents a very concise and easy way to integrate Bootstrap to a Spring MVC web project.

Add bootstrap to your project dependency

You can add Bootstrap to your project by downloading a zip file from the project web site http://getbootstrap.com, then unzip the content and copy it to the webapp resources directory.
But it is more interesting to get it as project a maven dependency to your project. This is made possible by the client-side web libraries webjars

<dependency>
    <groupId>org.webjars</groupId>
    <artifactId>jquery</artifactId>
    <version>2.1.1</version>
</dependency>

<dependency>
    <groupId>org.webjars</groupId>
    <artifactId>bootstrap</artifactId>
    <version>3.2.0</version>
    <exclusions>
        <exclusion>
            <groupId>org.webjars</groupId>
            <artifactId>jquery</artifactId>
        </exclusion>
    </exclusions>
</dependency>

Bootstrap javascript components needs JQuery. That’s why Bootstrap has a dependency to JQuery.
In this post we made the choice to exclude Bootstrap version and to import 2.1.1 version of JQuery.
You can manage the version by defining a dependency management to the project pom.

Configure Spring

We need to add a resource handler for /webjars/** to associate it with classpath:/META-INF/resources/webjars/ located in the bootstrap-3.2.0.jar

@EnableWebMvc
@Configuration
@ComponentScan(basePackages = { "com.mycompany.myproject.web.controller" })
public class MvcConfig extends WebMvcConfigurerAdapter {

    @Override
    public void addResourceHandlers(ResourceHandlerRegistry registry) {
        registry.addResourceHandler("/resources/**").addResourceLocations("/resources/");
        registry.addResourceHandler("/webjars/**").addResourceLocations("classpath:/META-INF/resources/webjars/");
    }
.................
..............

}

Add a bootstrap reference to the web page.

<%@ page language="java" contentType="text/html; charset=UTF-8" pageEncoding="UTF-8"%>
<!DOCTYPE html>
<html>
<head>
    <meta name="viewport" content="initial-scale=1, maximum-scale=1">
    <link rel='stylesheet' href='webjars/bootstrap/3.2.0/css/bootstrap.min.css'>
</head>
<body>
    
    <!-- YOUR CODE HERE -->
<script type="text/javascript" src="webjars/jquery/2.1.1/jquery.min.js"></script>
<script type="text/javascript" src="webjars/bootstrap/3.2.0/js/bootstrap.min.js"></script>
</body>
</html>

Jboss config

JBoss has a specific library management and in some cases it can’t find files in webjars dependency.
This problem can be solved by unpackaging webjars jars using maven dependency plugin.

<plugin>
    <groupId>org.apache.maven.plugins</groupId>
    <artifactId>maven-dependency-plugin</artifactId>
    <executions>
        <execution>
            <id>unpack</id>
            <phase>compile</phase>
            <goals>
                 <goal>unpack</goal>
            </goals>
            <configuration>
                 <artifactItems>
                      <artifactItem>
                          <groupId>org.webjars</groupId>
                          <artifactId>bootstrap</artifactId>
                          <overWrite>false</overWrite>
                          <outputDirectory>${project.build.directory}/classes</outputDirectory>
                          <excludes>**/maven/**, **/*.MF</excludes>
                      </artifactItem>
                 </artifactItems>
            </configuration>
        </execution>
    </executions>
</plugin>

Samples and components

You can find many samples and plugins for bootstrap that can gives you inspiration for your web application design.
I recommend those sites and projects:

The picture bellow presents a screenshot for a demo web application using bootstrap.
user-list